* Python: Generating and Reading PCAP Files
*
* Date: 10.08.2024
*\
When manually or automatically testing embedded software, it is often necessary to have test vectors ready in order to provoke a certain software behavior or to show that specific test vectors do not cause any problems. A widely-used file format for working with network-related data is PCAP, which is therefore also a good choice to keep network-based test vectors in. The PCAP file format is rather simple such that it is easily possible to generate such files programatically or to manipulate existing ones in ways necessary for a certain test. In this article, we will first explore the PCAP file format and then proceed to show how such files can be generated using the Python ecosystem. As a last step, a small parser implementation will be shown, which is essential if you want to process information from a PCAP file or manipulate the test vectors therein.
A given PCAP file is made up of a PCAP file header, which occurs once at the start of the file, and alternating pairs of PCAP frame headers and PCAP frame data, which follow the PCAP file header. A graphical representation of this structure can be found in Figure 1. It has to be noted that it is sufficient for a PCAP file to have a file header and that a given PCAP file might not contain PCAP frames at all, however useless such a file might be.

You can find details on the construction of the PCAP file header and the PCAP frames in the next two sections.
The PCAP file header, whose general position at the very beginning of the file has been indicated in Figure 1, is shown in detail in Figure 2.
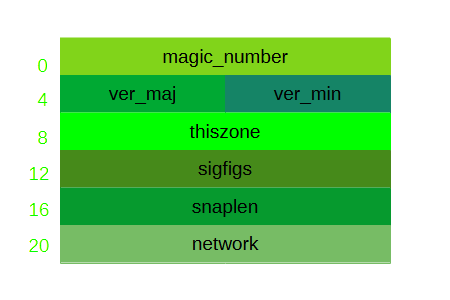
The PCAP file header has a fixed length of 24 bytes and consists of seven fields:
- The "magic_number" field is the first field of the PCAP file header and must always contain the hexadecimal number A1B2C3D4 for the file to be a valid PCAP file. Note that this means that the magic number is always at the first position of the whole file. As the expected magic number is known, the content of these four bytes is often used to distinguish the byte order of files (i.e. "big" or "little endian", something I will write about in a later article).
- The fields "ver_maj" and "ver_min" in Figure 2 start at byte number 4 and 6 of the PCAP file header and represent the major and minor version of the PCAP file format used, which will be 2.4 in our case. Thus, we will always set 2 for "ver_maj" and 4 for "ver_min" in the context of this article.
- "thiszone", which starts at byte 8 of the PCAP file header, allows to set the correction time between UTC and local time. The correction time has to be given in seconds and will always be 0 for the purposes of this article; thus, we will always assume UTC as the time for our generated timestamps.
- "sigfigs" starting at byte 12 of the PCAP file header contains the accuracy of the time stamps of the captured network frames. In practice, this is seldom used and usually set to 0.
- The field "snaplen" with start byte 16 contains the snapshot length for the captured frames in bytes. The author of this article usually sets this to 65535, which is enough for regular Ethernet frames and the usual implementations of Jumbo Frames. It is important to consider that the largest generated PCAP frame in the file is never larger than the value set in the "snaplen" field, so keep in mind that you might have to modify this field when you generate large frames for other uses than Ethernet. I will provide more information on this in the section on the PCAP frame format.
- "network", which is the last header field and starts at byte 20, contains the link-layer header type of the headers contained in the file's PCAP frames. For us, this will always indicate that there are Ethernet frame headers in the data, which has to be encoded in the "network" field by setting it to the value "1". If you aim to set another header type, you can find an extensive list *here.
As depicted in Figure 1, there is a potentially unlimited number of PCAP frames (which consist of a PCAP frame header and PCAP frame data) following the PCAP file header. Figure 3 shows the makeup of a PCAP frame in detail.
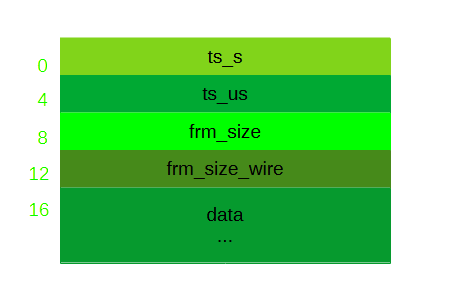
The PCAP frame header is of constant length, starts at byte 0 and ends at byte 15 of Figure 3 (which obviously makes the PCAP frame header 16 bytes long). It contains four fields:
- The "ts_s" field starts at byte 0 and indicates the capture time of the corresponding data in seconds since January 1, 1970 00:00:00 UTC. As mentioned in the section about the PCAP file header, you can modify the field "thiszone" of the PCAP file header to globally shift this time when the capture time is not based on UTC.
- "ts_us" starts at byte 4 and contains the microsecond part of the capture timestamp as an offset to the time in "ts_s". It is very important to assure, that this value never reaches or exceeds one second; once this value would reach the second mark, the value in the field "ts_s" must be incremented and the offset in "ts_us" must be recalculated. Note that there are PCAP file variants that use the field "ts_us" as an offset to "ts_s" with nanosecond instead of microsecond precision, which will not be done in this article.
- The field "frm_size" states the number of bytes, that were actually saved with respect to the given network frame. This is also the number of bytes, that follows the header in the "data" section of the PCAP frame.
- "frm_size_wire" is the number of bytes that were actually on the network, when the respective frame was captured. This number can be higher than the one in the field "frm_size", when the length of the saved data was limited by the "snaplen" constraint in the equally named field of the PCAP file header.
While there are many ways of creating structured data and writing them to a file, I would recommend that for generating file and frame headers of the PCAP type (or types that are similar) you use the "ctypes" module from the Python standard library. With this approach, you can translate the layout of the PCAP file header from Figure 2 into a "ctypes.Structure" in a straightforward and portable way and write it to a newly generated file as shown in Listing 1.
class PcapFileHeader(ctypes.Structure):
_pack_ = 1
_fields_ = [("magic_nr", ctypes.c_uint32),
("ver_maj", ctypes.c_uint16),
("ver_min", ctypes.c_uint16),
("thiszone", ctypes.c_uint32),
("sigfigs", ctypes.c_uint32),
("snaplen", ctypes.c_uint32),
("network", ctypes.c_uint32)]
target = open("empty.pcap", "wb")
header = PcapFileHeader(magic_nr=0xa1b2c3d4,
ver_maj=2,
ver_min=4,
thiszone=0,
sigfigs=0,
snaplen=65535,
network=1)
target.write(bytes(header))
In Listing 1, the class "PcapFileHeader" is created as a subclass of "ctypes.Structure" which yields an object, that is similar to a structure in C. While you could use "ctypes.BigEndianStructure" or "ctypes.LittleEndianStructure" to explicitly set the byte order of the resulting data, it makes sense for the PCAP file header to use the native byte order of the machine you are working on, which is provided by "ctypes.Structure".
In the class definition of "PcapFileHeader" the attribute "_pack_" must be set to "1". Due to the fact that "ctypes.Structures" are aligned the same way as a C compiler would do it, the resulting data would otherwise potentially include padding and the layout of the data would cease to be an exact mirror of the field layout. Padding introduced by C compilers to C "structs" is a topic I will write about in another article.
In the "_fields_" attribute of the "PcapFileHeader" class you can set up the PCAP file header layout as presented in Figure 2. Usually, I use the unsigned int data types "ctypes.uintN_t", with N representing the width of the integer, for this purpose. In C, the corresponding integer data types "uintN_t" are defined in "stdint.h" and the fact that the the exact width for these is fixed across all platforms increases the portability of programs significantly, which is also a benefit of using their equivalents in Python.
After the "PcapFileHeader" class has been set up in Listing 1, we open a file "empty.pcap" in mode "wb", which means that we replace any preexisting "empty.pcap" file and that we write data directly in a binary way (as opposed to text). File handling is an interesting topic on its own, which I will cover in another article.
The next step is to create a "PcapFileHeader" object through simple initialization with the desired field values. A conversion of the "ctypes.Structure" object to its binary representation can be done via the method "bytes" and writing the data to the file is the last step executed with a call to the file object's write method with the aforementioned binary representation as an argument.
The resulting file "empty.pcap" can now be opened with the program Wireshark, which presents the file as in Figure 4.

Obviously, Wireshark recognizes the file as a valid empty PCAP file. In the next section, let's fill it with some frames.
Before adding frames to the PCAP file we need to have an empty file, so let's assume that we still use the code from Listing 1 with the exception of changing the filename "empty.pcap" to "some_frames.pcap" and attach Listing 2 at its bottom.
_pack_ = 1
_fields_ = [("ts_s", ctypes.c_uint32),
("ts_us", ctypes.c_uint32),
("frm_size", ctypes.c_uint32),
("frm_size_wire", ctypes.c_uint32)]
for i in range(0, 5):
frame_header =\
PcapFrameHeader(ts_s=i,
ts_us=0,
frm_size=60,
frm_size_wire=60)
target.write(bytes(frame_header) + i.to_bytes(1, "big") * 60)
target.close()
In Listing 2, we do things very similar to Listing 1: First, we define a "PcapFrameHeader" class as a subclass of "ctypes.Structure", which mirrors the PCAP frame header layout shown in Figure 3 (notably, we leave out the data part at first). Subsequently, the PCAP frame header is instantiated five times with the "ts_s" field containing the number of the current iteration, the "frm_size" field indicating that 60 bytes of data will follow and the "frm_size_wire" field telling the reading software that indeed 60 bytes were "on the line" when the frames were "captured" (which is obviously fake).
In each one of the five iterations we then convert the instantiated PcapFrameHeader object to its binary form and attach 60 bytes of data right to the bytes object containing the binary header, which is written to the target file "some_frames.pcap" as a last step.
The data attached is the number of the iteration repeated 60 times. Note that as a preparation to generate the PCAP frame data to be attached to the PCAP frame header we convert the integer object to a bytes object using the former's "to_bytes" method with the arguments "1" and ""big"". The argument "1" indicates that the resulting bytes object should be one byte long and the string ""big"" determines, that the result should be in big endian byte order; the reason for choosing big endian here is no other than the fact that we have to choose something (the argument "byteorder" of the method "to_bytes" is mandatory) and that for the case of one byte there is no difference in the result between choosing little or big endian byte order.
You can view the result of running the program in Figure 5.
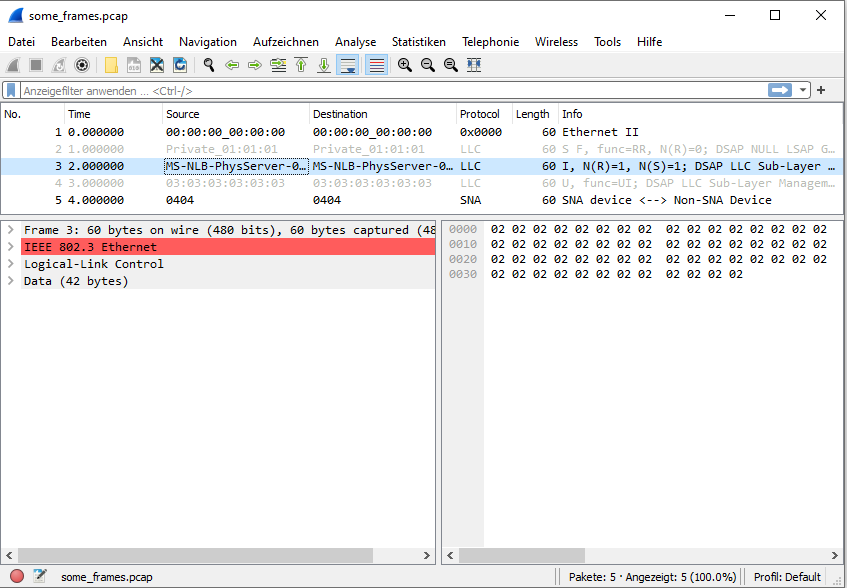
In Figure 5, the upper window shows an overview of all the generated frames. Frame number three (which is the frame resulting from our iteration number two, we started counting at zero!) has been opened and its "raw captured data" is shown in the window on the lower right. On the lower left side, Wireshark shows the interpretation of the "raw captured data" as Ethernet frames, which is due to us setting the link-layer header type to Ethernet by writing "1" into the PCAP file header's network field in Listing 1. There are some observations, we can make:
- The length of all frames is indicated as 60 in the "Length" column of the frame overview, which is the result of setting the "frm_size" fields to 60 in Listing 2.
- In the window on the lower left, Wireshark reports that 60 bytes were on the wire and 60 bytes were captured. The former is the result of us configuring "frm_size_wire" as 60 and the latter is (just as obove) a consequence of "frm_size" being 60.
- In the frame overview window, the full seconds in the "Time" column reflect the iteration numbers, as we set "ts_s" to these values in Listing 2. As a consequence of leaving "ts_us" at 0 for all frames, the part after the decimal point is always 0.
- We configured the PCAP frame data section to be made up of 60 bytes containing the iteration number in Listing 2. The PCAP frame data section is interpreted by Wireshark as the "captured data", which is why the data for the selected "captured" frame, which is the one that resulted from iteration "2", contains 60 times this very number.
- In the window on the lower left, Wireshark complains, that the IEEE 802.3 Ethernet protocol is violated. This is because we did not care at all to produce valid Ethernet frames in the generation process and the Ethertype field in the respective frame contains the hexadecimal number 0202, which in turn would actually signal that the Ethernet frame is 514 bytes long, while in reality its size is only 60.
Now, let's go to the other side, assume the file "some_frames.pcap" as given and build a PCAP file reader. We will first check whether a given file is a valid PCAP file and then proceed to read out the contained PCAP frames.
For checking whether a given file is a PCAP file, we will again use the "ctypes" module and the class "PcapFileHeader" from Listing 1. With the "PcapFileHeader" in place, we can implement a PCAP file check as shown in Listing 3.
target = open("some_frames.pcap", "rb")
header = target.read(ctypes.sizeof(PcapFileHeader))
if len(header) < ctypes.sizeof(PcapFileHeader):
raise Exception("Not a PCAP file!")
header = PcapFileHeader.from_buffer_copy(header)
if header.magic_nr != 0xa1b2c3d4:
raise Exception("Magic number wrong. Not a PCAP file!")
The code in Listing 3 first opens the file "some_frames.pcap", that we generated before, in binary read-only mode ("rb").
Then it attempts to read out the PCAP file header and loads the resulting data into the variable "header" in binary form. Note that we don't really need to care about the exact number of bytes, that the PcapFileHeader is made up of, as we use the convenient "sizeof" method provided by the object. "sizeof" works similar to its version in C and will deliver the number of bytes, that the "PcapFileHeader" takes up, provided we correctly described the layout in Listing 1 and (in the general case) set the attribute "_pack_" to "1".
The Python interpreter attempts to read out the given number of bytes and will stop reading in case it hits the end of the file. So if the data read out from the file is shorter than the PCAP file header (which is the minimum content of a PCAP file!), we already know that the file is either corrupt or contains something entirely different than PCAP-formatted data; in this case, we abort and alert the user.
For the next step, whe know that we have binary data with the length of a PCAP file header saved in the "header" variable. We give the binary data to the static "from_buffer_copy" method of the PcapFileHeader class and replace the "header" variable with the result. "header" now contains the binary data interpreted as the C-style struct outlined in Figure 1 and we may access individual fields of the struct as attributes of the variable "header".
As a second check, we can now easily compare the "magic_nr" attribute of the PcapFileHeader object contained in "header" and compare it to our expectation. We know that a valid PCAP file must contain the hexadecimal number A1B2C3D4 in the magic number field and will alert the user and terminate the program, if this is not the case.
Reading out a the frames contained in a PCAP file is also pretty easy and can be implemented as in Listing 4, which is meant as a continuation of Listing 3 with the "PcapFrameHeader" class from Listing 2 being defined somewhere above.
def handler(frame: bytes) -> None:
print(frame)
def nextframe(file_):
frame_header = file_.read(ctypes.sizeof(PcapFrameHeader))
if len(frame_header) == 0:
return b""
frame_struct = PcapFrameHeader.from_buffer_copy(frame_header)
frame_data = target.read(frame_struct.frm_size)
return frame_data
while True:
frame = nextframe(target)
if frame == b"":
break
else:
handler(frame)
target.close()
When the listed prerequisites are fulfilled, the function "nextframe" will first read the next PCAP frame header from the file "some_frames.pcap" in binary form. The binary data will then be interpreted by feeding it into the static method "from_buffer_copy" of "PcapFrameHeader" and the resulting object will be saved into the variable "frame_struct". We extract the field "frm_size" from the read out frame header and tell the file's "read" method to extract this very number of bytes from the file immediately thereafter; what we receive and save in "frame_data" is the PCAP frame data section as indicated in Figure 3. Returning the PCAP frame data section content is the last step executed in the function "nextframe".
For handling the frames extracted from the file we have defined the function "handler", which will take the frame and simply print it out to the screen. Obviously, the handler can be modified to do everything needed for a particular use case.
The while loop at the bottom end of Listing 4 is what drives the process of reading out the file. As long as the function "nextframe" can still read out a new frame from the file, the PCAP frame data it is simply handed to the handler. Once the end of the file is reached, which "nextframe" tells us by returning an empty "bytes" object, the loop is aborted and the program exits.
Working with "ctypes" to generate a PCAP file works very well and is pretty performant in case you have to generate large datasets. In the present article it has been shown how you can generate PCAP files on your own for whatever purpose you need them and how to read them out again. In general you can replay the generated files to an Ethernet network of your choice for example via the program "tcpreplay" or by building your own replay software for instance based on libpcap or npcap.
The file handling in this article is very direct and will work well in smaller scripts, but not when a larger software package is designed. Therefore, the *next article is dedicated to the development of a more scalable file interface for the algorithms outlined in the present article, which can be used even in large Python applications.
What remains is the problem, that we have not generated valid Ethernet frames, which will be the topic of one of the next articles.